How Can You Edit VRC Avatar Textures?
You can edit most VRChat avatar textures without touching the mesh: find the texture used by the material, change it in an image editor, then assign the new file in Unity. Start with a small clothing recolor or hair tint before adding logos, seams, or glow effects, because the hardest part is usually matching the right file to the right material.
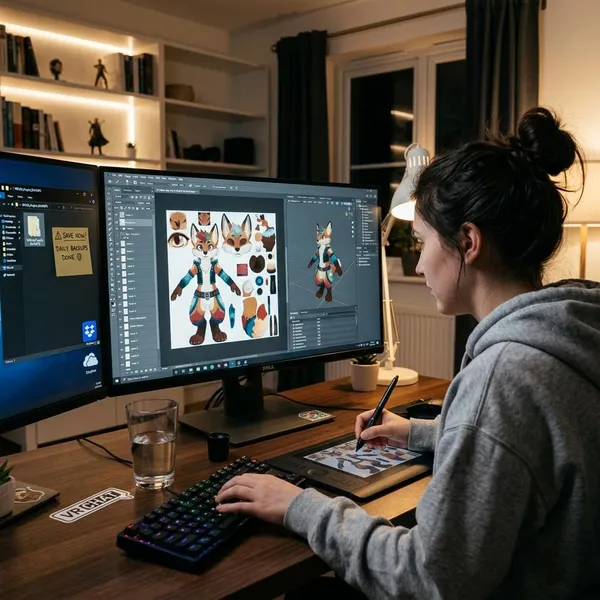
How to edit a VRChat avatar texture
The basic workflow is simple: identify the texture, edit a copy, export it cleanly, replace it on the correct Unity material, and preview the avatar before upload. For a quick color change, that may take only a few minutes once you know which file controls the part you want to change.
Find the texture and material
Select the avatar part in Unity first, then inspect its material slots. Click the material and look for the texture assigned to fields such as Main Texture, Albedo, Base Map, or Base Color. This is more reliable than guessing from filenames like body_02 or outfit_alt.
Open the texture in an image editor
Open a duplicate of the texture in Photoshop, GIMP, Krita, Affinity Photo, or another editor that supports layers and transparency. GIMP and Krita are enough for most recolors, pattern overlays, small decals, and alpha-safe edits.
If the avatar includes a PSD, Clip Studio file, or layered source file, use that instead of the flattened PNG when possible. Layered files often separate colors, shadows, highlights, masks, and linework, which makes cleaner edits much easier.
Make your texture changes
Work in layers rather than painting directly onto the base image. For a simple everyday avatar, hue adjustments and masks are usually enough. For a finished public upload or a paid customization, spend more time checking edges, seams, transparency, and shader effects.
Export the new texture
Export as PNG or TGA unless the avatar creator specifies another format. Keep the same dimensions as the original while you are still testing; resizing too early can make blur, alignment issues, or alpha problems harder to diagnose.
Use a new filename such as jacket_blue_v1.png instead of overwriting the original file. That gives you a clean fallback if Unity displays the edit badly or you decide to make another color version later.
Apply it in Unity
Drag the edited texture into your Unity project, open the material used by the avatar part, and replace the texture in the main visible color slot. If the result looks darker, washed out, or oddly tinted, check the material color multiplier before blaming the image file.
Preview and upload the avatar
Preview the avatar from the front, side, back, and close-up angles before uploading. Pay special attention to cuffs, collars, shoulders, hair cards, skirt hems, ears, tails, and any area where UV islands meet.
- Confirm the active material: the edited file must be assigned to the material the avatar is actually using.
- Check alpha and glow: cutouts, lace, hair, and emission details can break if shader settings are wrong.
- Test in motion if possible: poses and animations can reveal stretching that a neutral view hides.
- Run the VRChat SDK check: it will not catch every texture issue, but it can reveal setup problems before upload.
How to find the right VRChat texture
Finding the correct texture is often the real beginner hurdle. Avatar packages may include body textures, clothing variants, masks, normal maps, emission maps, old versions, and preview images that look related but are not all active in Unity.
Check the body and clothing files
Start with folders named Body, Clothes, Hair, Materials, Masks, or Emission. Color textures often use names such as diffuse, albedo, basecolor, or main.
Match textures to Unity materials
Unity shows the real connection between a texture and the model. A file called Outfit_A might control more than the jacket, and a texture named Body might include underwear, socks, or skin details on the same sheet.
For shared texture atlases, zoom in before editing. Changing a small red panel on a clothing sheet may also affect gloves, ribbons, or accessory straps if they share the same colored area.
Use layered files when available
Layered source files are usually the cleanest option for recolors because they may already include masks for shirts, trim, skin, hair, decals, and shading. If you only have a flat PNG, create your own saved selections for areas you plan to edit more than once.
How to edit a VRChat texture safely
Safe texture editing means you can undo mistakes and still keep the avatar looking natural in Unity. The main things to protect are the original file, image size, transparency, UV alignment, and existing painted shading.
Keep the original image size
Keep the edited texture at the original resolution while designing. If the source is 2048 by 2048, export your working version at 2048 by 2048 too. Upscaling usually adds file size without adding real detail, while early downscaling can make faces, makeup, labels, and fabric edges look soft.
After the edit is approved on the model, you can test lower max sizes in Unity for performance. Compare the avatar close up and at normal social distance; some accessory textures can be reduced with little visible loss, while face and main outfit textures usually need more care.
Use masks for clean recolors
Masks let you change only the area you mean to edit. They are especially useful for collars, sleeves, shoes, cuffs, straps, and other parts where a sloppy brush edge is easy to notice.
Preserve existing shading
Most avatar textures already contain painted shadows, highlights, gradients, and small surface details. If you cover them with a flat color, the result can look like a sticker rather than clothing or skin.
Paint carefully around UV seams
UV seams are where the 3D model is cut into flat texture islands. Stripes, tattoos, text, and large graphics can break at those borders even when they look perfect in the image editor.
For seam-heavy edits, export or enable a UV guide if you have one. If you do not, make a small test mark, save, and preview it in Unity to learn where the texture lands. This is slower than guessing, but it prevents a logo from wrapping halfway around an arm or splitting across a jacket edge.
Keep transparency intact
Hair cards, lace, cutout clothing, decals, and some accessories depend on an alpha channel. If transparency is flattened or exported with a solid background, the avatar may show ugly blocks around areas that should be see-through.
Use PNG or TGA when transparency matters, then check both the editor and Unity import settings. A correct alpha texture still needs a material mode or shader setup that supports cutout, fade, or transparent rendering.
How to apply an edited texture in Unity
Unity is where you assign and test the edited file. The actual painting happens in your image editor, but Unity decides how the texture appears on the avatar through material slots, shader settings, import settings, and lighting.
Import the new texture
Drag the edited PNG or TGA into the Unity project folder where you keep avatar textures. Select it in the Project window and check the Inspector. For a normal color texture, it should not be imported as a normal map or another special texture type.
If the image uses alpha, preview the transparency in Unity before assigning it. This helps catch export mistakes before you start changing material settings.
Open the correct material
Select the avatar mesh in the Hierarchy and look at the material slots in the Inspector. If the mesh has several materials, click each one and compare its texture preview with the part you want to edit.
Be careful with shared materials. Editing one shared material can change several outfit pieces at once, while editing the wrong material asset may appear to do nothing at all.
Replace the main color texture
Drag the edited file into the main color texture slot. Depending on the shader, the label may be Main Texture, Albedo, Base Map, or Base Color Map. The Scene view should update immediately if the right material is selected.
Check the shader settings
Shader settings can change the final look more than beginners expect. A non-white tint can shift the color, high emission can blow out details, and an opaque mode can hide transparency. On custom avatar shaders such as Poiyomi, also check masks, detail maps, matcaps, and emission settings if the result does not match your editor.
Do not change every setting at once. Adjust one obvious setting, preview, then continue. That makes it easier to find the real cause instead of creating three new problems while fixing one.
Preview the avatar
Look at the avatar in normal lighting, darker lighting, and from several distances. A tiny texture flaw may not matter on a casual private avatar, but it is worth fixing if the edit is on the face, chest, hands, or another highly visible area.
How to optimize VRChat avatar textures
Texture optimization is about keeping the detail people notice and reducing the weight they do not. It is easy to make an avatar heavier by adding duplicate 4K textures, unused masks, extra emissions, and oversized accessory maps.
Reduce oversized textures
Not every part needs the same resolution. Face, hair, skin, and main clothing pieces usually deserve more detail than belts, cuffs, shoe soles, tiny metal parts, or hidden accessories.
| Texture area | What to check first | Practical judgment |
|---|---|---|
| Face or makeup | Sharpness close up | Reduce carefully, if at all |
| Main outfit | Fabric detail and seams | Test one step lower and compare |
| Small accessories | Visibility during normal use | Often safe to reduce |
| Hidden or unused variants | Whether the material uses them | Remove or disconnect if not needed |
Compress textures in Unity
Unity compression can reduce memory use, but it can also create blocky gradients, rough alpha edges, or muddy face details. Test compression on the avatar, not only in the file preview.
Compression is usually safer on broad fabric colors than on makeup, thin line art, transparent hair, decals, or small text. If artifacts are visible in normal viewing conditions, use a lighter setting for that texture.
Remove unused texture maps
Disconnect maps that no longer affect the final avatar. Old emission maps, unused masks, backup variants, and leftover test textures make the project harder to understand and can lead you to edit the wrong file later.
Keep only the detail you need
A good-looking avatar does not need maximum detail everywhere. Put texture quality where people actually look: face, hair, hands, and main outfit areas. Trim back detail on parts that are small, hidden, rarely viewed close up, or only visible in very specific lighting.
Conclusion
Texture editing becomes much easier when you treat it as a controlled loop: confirm the active material, edit a copy, preserve size and alpha, preview on the model, then optimize only after the design works. Start with a simple recolor if you are new, and save seam-heavy patterns, logos, or glow edits for when you are comfortable checking UVs and shader settings.